


What Is a Medical Records Release Form?
A medical records release form gives you control over who can access your protected health information (PHI). It’s required under the Health Insurance Portability and Accountability Act (HIPAA), a US federal law that protects your privacy and sets rules for how providers share medical records. When you make a request, the provider will send only what’s already in the file, which usually includes:
- Doctor’s notes
- Lab results and test reports
- Imaging, like X-rays or MRIs
- Billing and insurance details
Some records are off limits. The form won’t include:
- Private psychotherapy notes
- Documents prepared for legal cases
Sharing without proper consent could lead to a breach of confidentiality. That’s why providers follow strict HIPAA rules when releasing information. They’ll also let you choose how the records are sent, by mail, email, or another secure method.
When Should You Complete a Medical Records Release Form?
A medical records release form lets you request your health information or share it with someone else. If you’re helping another person as their legal guardian or representative, you can use the form for them too. People often use it to:
- Get records from a provider or health plan
- Send information to a doctor or specialist
- Give a caregiver or family member access
- Share details for legal, insurance, or personal reasons
Keep in mind that providers and health plans can ask you to fill out a form, but only if it doesn’t slow things down or make it harder to get your records. And they typically accept forms by email, through a secure web portal, or by mail.
How Do You Write an Authorization Letter for Medical Records Release?
Providers won’t release records without proper authorization. Here’s how to write a letter that gives them everything they need to move it forward.
1. Use a Ready-to-Go Template
Download Legal Templates’ free medical records release form, available in Word and PDF. It includes all the key fields—patient details, purpose, recipients, and signatures.
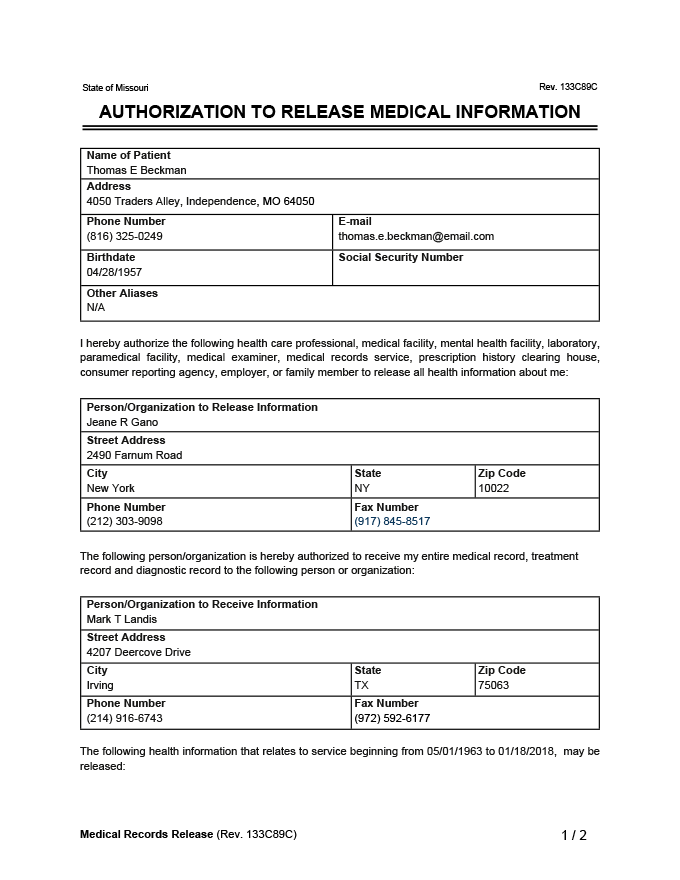
2. Start with the Patient’s Basic Information
Start by entering the patient’s full name, date of birth, social security number, contact details, and full street address, including the city, state, and ZIP code. This information helps the provider match the request to the correct file and confirm the patient’s identity.
3. Say Who’s Making the Request
Let the provider know if you’re filling out the form for yourself or for someone else. If you’re a legal guardian, parent, or hold power of attorney, include your name, your role, and how you’re authorized to act on the patient’s behalf. Provide copies of any documents giving you authorization to complete the request.
If you’re authorizing the release of someone else’s PHI, you may be acting under a medical power of attorney or a minor power of attorney. In this case, you should identify yourself as the patient’s guardian or legal representative on the authorization form
4. Explain Why You’re Requesting the Records
Briefly mention the reason for the request so the provider knows how to process it. Common reasons include:
- Follow-up care or treatment
- Getting a second opinion
- Filing an insurance claim
- Handling a legal matter
5. List the Records You Need
Be specific about what you’re asking for. You can request:
- All medical records
- Records from a certain facility, such as a primary care doctor’s office or a specific hospital
- Certain types of documents, like test results, imaging, or billing details
- Records from a specific time period
6. Flag Any Sensitive Information
If the request includes details about mental health treatment, substance use, or HIV status, make sure to clearly state that. You’ll need to give extra permission to release this type of information.
7. Say Who’s Sending and Receiving the Records
Start by naming the provider or facility that holds the records. Then, include the name and contact details of the person or organization you want to receive them. This might be a new doctor, an insurance company, or even yourself. Clear information helps avoid delays.
8. Add Final Details and Sign
Next, include when the authorization should begin and how long it should last—90 days, one year, or whatever fits your situation. Some forms will expire within a set time if no expiration date is included. To finish, the patient or their legal representative needs to sign the form. Without a signature, the provider can’t release the records.