What Is an Idaho Quitclaim Deed?
An Idaho quitclaim deed allows a property’s owner to convey rights and interests in a property to a grantee without any guarantees of ownership or title quality. This type of deed works best when the two parties know and trust one another.
With an Idaho quitclaim deed, the transfer occurs as-is, meaning the grantee accepts the property and its title exactly as it is. Ideally, the title will already be free of liens, and the ownership will be clear. This way, the grantee can receive the property, knowing exactly what they’re getting.
What to Include in an Idaho Quitclaim Deed
Your Idaho quitclaim deed must specifically include the term “quitclaim” in the context that the grantor “quitclaims” the property to the grantee. The word “grants” implies warranty and should only be used in a deed that guarantees the grantor’s ownership, like a warranty or grant deed (ID Code § 55-612).
ID Code § 55-818 and § 31-2413 outline content requirements for quitclaim deeds:
- The title “Quitclaim” on the first page
- The name and address of the grantor and grantee
- The grantor’s marital status
- The return name and address, which is usually the grantee, but can be anyone of your choosing
- The name of the person requesting recordation (ID Code § 31-2410)
- The property address.
- The property’s homestead status (ID Code § 55-1007)
- The property’s legal description, including metes and bounds
- A granting clause, which is the statement that describes the transfer
- A consideration clause that states the value of the property and the amount of money exchanged for it
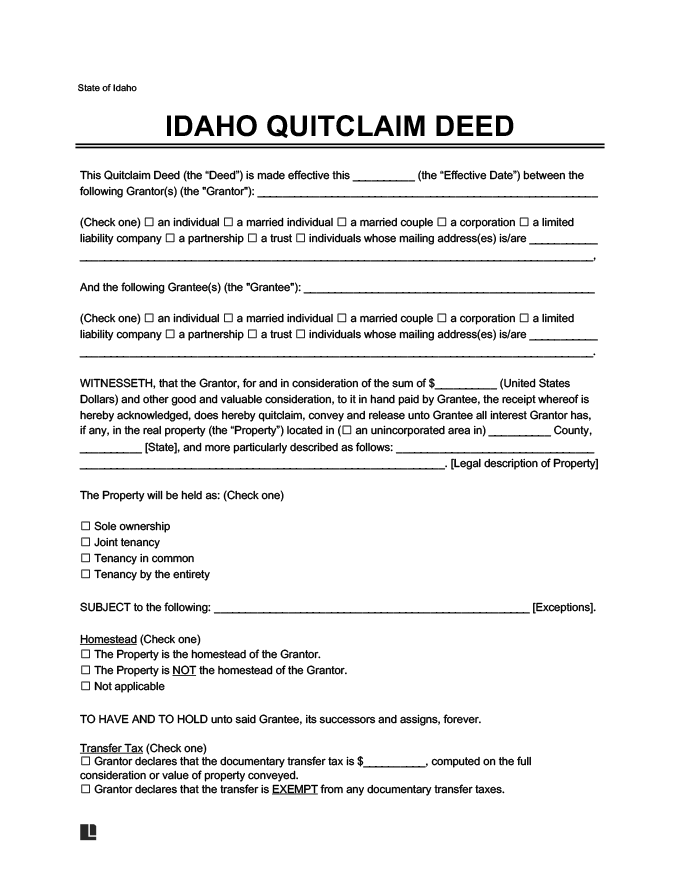
Sample Idaho Quitclaim Deed
See an example of an Idaho quitclaim deed below to better understand how to structure it. Then, write your own using Legal Templates’s guided form and download it in PDF or Word format.
Formatting Requirements for an Idaho Quitclaim Deed
State law (specifically ID Code § 31-3205) has established a standardized format and system for properly recording quitclaim deeds. To support these processes and be considered legally valid, the document must:
- Use paper that is at maximum size 8.5 x 14 inches (legal size)
- Each page shall be typewritten or be in legible writing
Each Idaho county may implement specific requirements, such as requiring the deed to be written in a font with a minimum size of 10 points or leaving a 3-inch margin at the top of the first page for official use. Check with your county to comply with the applicable requirements.
How to File a Quitclaim Deed in Idaho
Filing an Idaho quitclaim deed is simple when you follow a few key steps. Here’s how to complete your form and submit it for official recording without unnecessary delays.
Step 1 – Obtain the Original Property Deed
You may have the original property deed in your records as the grantor. If you can’t find it, request it from your local county clerk’s office. From this document, you can extract the legal description and other important details for completing your ID quitclaim deed.
Step 2 – Fill Out the Form
Use Legal Templates’ guided form to fill out your Idaho quitclaim deed. Our attorney-approved template ensures you include all the key elements to make your deed legally binding.
Step 3 – Complete the Residential Property Disclosure Statement
According to ID Code § 55-2504, a Residential Property Disclosure Statement must accompany your Idaho quitclaim deed, except in cases where:
- The transfer is between co-owners
- The grantor is transferring property to a spouse or lineal descendant
- The grantor is transferring property to a current or ex-spouse due to separation or divorce
- The grantee lived on the property for at least one year
- The grantor is a non-resident owner who inherited the property
- One of the other scenarios laid out in ID Code § 55-2505 exists
Step 4 – Sign and Have the Deed Notarized
The grantor must sign before an authorized notary public who acknowledges the signature (ID Code § 55-805). The grantee’s signature is optional on this form, as are witness signatures.
Both spouses must sign if the grantor is married or the property is registered as their homestead unless one spouse signs a spousal waiver of homestead rights that must be attached to the quitclaim at filing (ID Code § 32-912).
Step 5 – File the Deed and Wait for Processing
Take the deed to the Idaho county clerk in the county where the property is located for filing. Pay the county’s recording or filing fees, as discussed in the next section.
Processing times for quitclaim deeds may vary depending on factors like the specific county and the time of year. However, recordation often takes about seven to 10 business days.
During this time, the county recorder’s office will check that the information provided is complete and accurate. The recorder will then endorse and index the deed, add it to the county’s reception book, and scan it into the system of records. Lastly, the original documents will be sent to the address included in the “return to” section of the deed.
How Much Does a Quitclaim Deed in Idaho Cost?
Filing a quitclaim deed in Idaho comes with a few basic costs. Here’s what to know about filing fees, potential taxes, and how they may affect your property transfer.
Note: Idaho does not charge a real estate transfer tax.
Filing Fees
The minimum charges for filing deeds at county recorders’ offices include (ID Code § 31-3205):
- A base fee of $15 for the first 30 pages
- Another $3 per page beyond 30
- An $11 fee for recording a map or plat
- A $5 per page fee for recording a survey
Federal Gift Tax
IRS Form 709 provides instructions and exemptions for the federal gift tax, which applies to gifted property over a certain amount at a rate that varies from year to year.
Property is considered a gift if no consideration (or a nominal payment that does not reflect the property’s value) is exchanged for the transfer of the property.
Capital Gains Tax
This applies in cases where a capital asset, like property, is exchanged for more than its cost. Both IRS Topic No. 409 and IRS Publication 551 discuss the federal capital gains tax, including its valuation and exemptions.
According to the Idaho State Tax Commission, while the state taxes capital gains as income, it also allows for a deduction of up to 60% of capital gain net income in several cases. Complete Form CG to calculate your deduction.