What Is a Rental Inspection Checklist?
A rental inspection checklist documents the condition of a rental property. The tenant and landlord complete this checklist to identify damage or maintenance needs. Landlords use these checklists to ensure tenants follow the lease terms and protect the property value.
Our rental inspection checklist template offers step-by-step instructions for creating your document. Use our customizable form to record the condition of each area of your property.
When Should You Use a Rental Inspection Checklist?
You can use a rental inspection checklist whenever you walk through the unit to check its condition. Typically, landlords use a checklist for the following inspections:
- Move-in inspection: Before the tenant moves in, the landlord and tenant walk through the property together. This may include checking the functionality of appliances and utilities.
- Mid-tenancy inspection: This inspection checks the property halfway through the lease term. It evaluates the tenants’ care of the property and can catch issues before they occur or escalate.
- Move-out inspection: The tenant and landlord evaluate the property’s condition at the tenant’s departure. At this time, the landlord can assess damages beyond normal wear and tear and may determine necessary fees for extra cleaning or damages.
- Short-term rental inspection: Encourage short-term tenants to document move-in and move-out conditions. Many short-term rental contracts include terms about fees for items left behind or damages. Inspecting between tenants ensures safety and legal compliance.
Rental Inspection Legal Requirements
While not federally mandated, some states or cities require landlords to conduct inspections. In some cases, the inspection checklist is only required if the landlord collects a security deposit. Work to understand the local guidelines for inspections to ensure proper handling. The table below provides information about the states and cities with inspection laws.
| State | Required Forms | Statute |
|---|---|---|
| Arizona | Move-In / Move-Out Condition Checklist | § 33-1321(C) |
| Arkansas | Move-In Inspection Form | § 18-17-502 |
| Georgia | Move-In / Move-Out Condition Report | § 44-7-33 |
| Hawaii | Property Condition Form | § 521-42(a) |
| Kansas | Inventory and Condition of the Premises | § 58-2548 |
Why Are Rental Inspections Important?
Rental inspections are important for identifying, fixing, and communicating property issues or damage. As a landlord, the inspection checklist provides documentation of your property’s condition and offers information at a glance. The other benefits of rental inspections include:
- Protecting your property: An inspection lets you identify and treat issues to minimize damage and costs.
- Ensuring tenant comfort: Routine inspections ensure tenants have habitable conditions and working appliances.
- Evaluating tenant behavior: Mid-tenancy inspections help gauge the tenant’s responsibility. You can use this information to help you decide whether to renew the lease at the end of the term.
- Identifying responsibilities: Your rental inspection checklist helps determine which tasks are the tenant’s or landlord’s responsibility.
How to Write a Rental Inspection Checklist
Writing and filling out your rental inspection checklist requires you to include sections for each area of the property. Providing information about the tenant, location, and inspection date also helps keep your documents organized. Write a rental inspection checklist with the following steps.
1. Gather Tenant and Landlord Information
Record the full legal name of both the tenant and landlord. Include any individuals living on the property and any guarantors listed on the lease. Also, provide contact information for each party involved. If a management company operates the property, include the business name, address, and phone number.
2. Note the Property and Location
List the address of the property being inspected. Also, state any amenities or exterior features, such as a shed, pool, garage, or deck. Provide the full legal address of the home and list a specific apartment number or unit name when applicable.
3. List Interior Items
Your checklist should include sections for each interior room of the rental property. List the number of bedrooms and bathrooms. Also include the living room, dining room, kitchen, den, office, basement, and attic. For each room, inspect and record the condition of the walls, appliances, flooring, cabinets, lights, and electrical items.
Make sure you inspect the interior for pests, plumbing issues, mold, and structural damage.
4. Add Exterior Inspections
It’s equally important to inspect the property’s exterior components. Look at the integrity and condition of the lawn, yard, deck, roof, gutters, windows, and garage. Catching roofing or structural issues early allows for proactive repairs that minimize damage and costs. Check each area for cracks, leaks, and proper sealing.
5. Provide the Inspection Date
Document the date of the inspection to keep your records organized. Also, note the type, such as move-in or move-out inspections, and record the names of individuals present. If you inspect the property under the same lease, you may compare them on the same form. It is also possible to have separate forms for each inspection.
Taking photos or videos of any problem areas helps communicate and prove damages in a dispute.
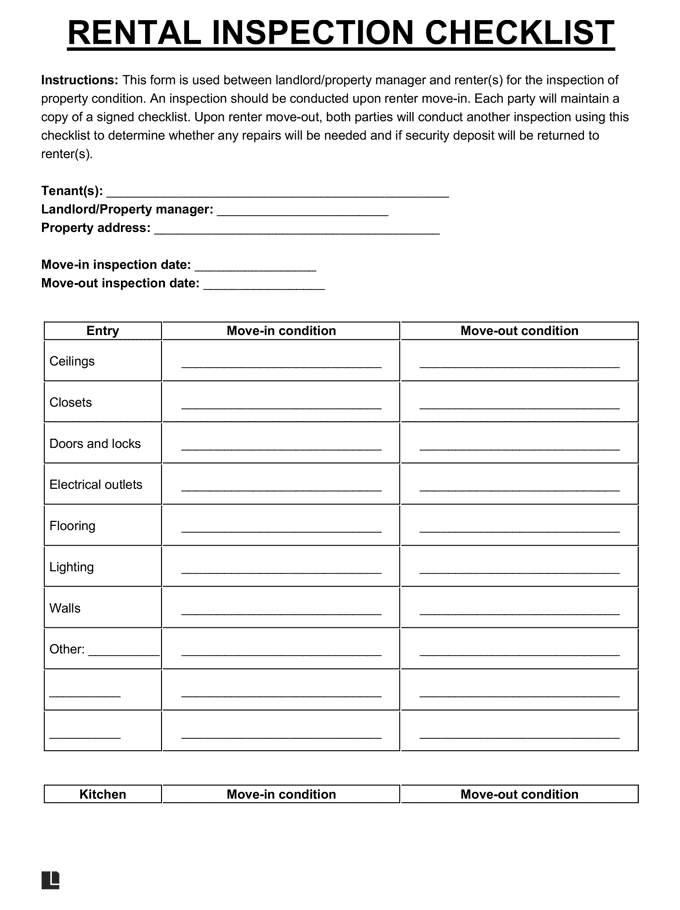
Rental Inspection Checklist Sample
View our free rental inspection checklist form below for the correct format and elements. Our downloadable form offers customizable checklist items for every part of your property.
How to Communicate With Tenants About Inspections
The rental inspection process requires cooperation from both parties. As a landlord, use this opportunity to establish trust with your tenants. Pay extra attention and work with tenants during the following steps in the rental inspection process:
- Scheduling the inspection: Work with the tenant to find a day and time to walk through the unit and complete the checklist together. Also, provide a notice for the landlord to enter in advance. Make sure that your notice complies with any state and local laws and the terms of your lease.
- Keeping records: Make copies of all inspections and store them in a safe place. Also, provide your tenant with a copy and encourage them to keep organized records of conditions, repairs, and inspections.
- Following up on maintenance: Communicate any follow-up maintenance to the tenant in writing. Alert the tenant and record the type of repair and the repair date.
- Charging fees: Before a move-out inspection, provide tenants with a list of cleaning costs or repairs beyond normal wear and tear. Once you complete the move-out inspection, communicate issues and fees with an itemized list and pictures.